


Today we’re going to talk a little Bridal and a lot of Beauty!
In case you missed it, our wedding photographer , Laura Gordon Photography, blogged our wedding on her website yesterday. Check it out! It was fun for me to see those pics because most are detail shots, and lets be honest, as the Bride, I saw absolutely none of those details on the day of! Laura also re-launched her website and branding and if you head to her main page you might just see a few familiar faces and a ton of familiar details!
I can’t wait to get my hands on the rest of the pics! Laura shoots in film and digital so we’ll have a gazillion old school prints to go through very, very soon….and stay tuned because obviously we’ll have to celebrate here on the blog with wedding photo posts!
Now onto the Beauty….
With the move, my mani’s are taking a daily beating! I cannot stand chipped nails and always go for a shellac manicure when given the choice….however, I have yet to find a nail spot in Bangor, so for now, I’m going to have to suck it up and DIY.
This is my variation on a method that I found on Pinterest.
Here’s what you’ll need:
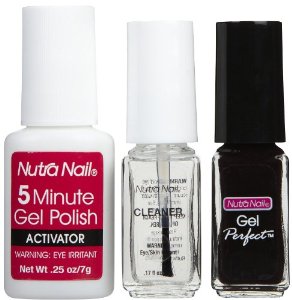
Nutra Nail Gel Perfect Kit
Essie 3 Way Glaze
and a color of your choice
I’m starting to love the statement nail concept (it had to grow on me!) but now I think it’s really fun for summer.
My current favorite summer pinks are Essie Watermelon and Essie Madison Avenue.
Method:
Open up your Nutra Nail Kit and pull out the 5 Minute Gel Polish Activator (on the left)

Slap on a thin coat of that bad boy.
Next you’ll need a coat of the Essie 3 Way Glaze
I like to let the 3 Way Glaze sit for a minute so that it’s not super wet when the color is applied.
Apply 2 coats of your color – if you’re doing a statement nail, leave one nail on each hand free of color. I usually make my pointer or my ring finger the statement color,
Apply 2 coats fo the statement color (the second color that you have used yet) to the colorless fingers.
Let the color dry for a minute before proceeding our you’ll end up with tons of tiny bubbles in the paint (fun for champagne, not for nails)
Apply another coat of 3 Way
Warning: you will need Acetone to remove
If you aren’t into the heavy stuff, I have had success in making a home made mani last tons longer by applying 2 coats of 3 Way as base and then 2 coats of 3 Way on top of the color. If you do this, you muuuust wait inbetween steps to avoind bubbling.
xoxo,
S
Leave a comment